Mastering the Frosted Brownies Recipe: Achieve Crumb-Free Perfection
Brownies are, without a doubt, a universally adored dessert. Their rich, fudgy, or delightfully cakey chocolate goodness often needs no embellishment. Yet, for many, the ultimate indulgence comes with a generous layer of luscious frosting. A well-executed
frosted brownies recipe transforms a simple square into an irresistible treat, elevating it from humble bake sale staple to sophisticated dessert. But if you’ve ever found your perfectly smooth frosting marred by flakes of brownie top, you know the frustration. That shiny, crackly crust, while a hallmark of a great brownie, can become a real adversary when it comes to achieving a pristine finish.
Fear not, chocolate lovers! We're here to share a game-changing technique that promises a seamless, crumb-free frosting experience every single time. Prepare to say goodbye to those tiny, tell-tale crumbs mixed into your beautifully spread icing and unlock the secret to truly stunning frosted brownies.
Crafting the Perfect Brownie Base: Fudgy, Cakey, or Somewhere In-Between?
Before we even think about frosting, the foundation of any exceptional
frosted brownies recipe is, naturally, the brownie itself. What defines "perfect" often comes down to personal preference: do you crave a dense, gooey, fudgy brownie, or a lighter, more cake-like texture?
* **For Fudgy Perfection:** Recipes leaning towards a higher fat-to-flour ratio, often using melted butter or oil and less leavening, tend to produce those dense, melt-in-your-mouth squares. Quality cocoa powder or melted unsweetened chocolate is key here for deep flavor.
* **For Cakey Comfort:** If you prefer a brownie that resembles a moist cake, look for recipes with more flour, often incorporating baking powder or soda, and sometimes using creamed butter and sugar.
Regardless of your preferred texture, one golden rule remains: **do not overbake your brownies!** Overbaking is the quickest way to dry out your delicious creation, turning a potentially fudgy delight into a crumbly disappointment. Keep a close eye on them; brownies are often ready when a toothpick inserted near the edge comes out with moist crumbs, and the center still looks slightly underdone. Residual heat will continue to cook them as they cool. For more tips on achieving your ideal brownie base, you might want to explore
frosted brownies recipe - Article 1.
The Secret to Flawless Frosting: Say Goodbye to Crumb-Filled Icing!
The moment of truth arrives when your perfectly baked brownies emerge from the oven, showcasing that characteristic shiny, often crackly top. While beautiful, this delicate layer is notorious for flaking off and mingling with your frosting, creating a less-than-ideal finish. But what if we told you there’s a simple trick to bypass this entire problem?
The key to a consistently smooth, crumb-free frosting job is ingeniously simple: **frost the underside of your brownies.** That's right, just like you would a cake layer, you're going to flip the entire slab of brownies before applying your icing. The underside is naturally smooth and uniform, providing the perfect canvas for your frosting.
Here’s how to set yourself up for success:
Step 1: Prepare Your Baking Pan with Precision
This step is absolutely crucial for the flip technique. You need your baked brownies to release cleanly from the pan.
* **Grease and Flour Thoroughly:** Even if a recipe doesn't explicitly state it, giving your pan a good grease (with butter, shortening, or baking spray) and then a light dusting of flour (tapping out any excess) provides a non-stick barrier. For chocolate brownies, you can even dust with cocoa powder instead of flour for a seamless look.
* **Parchment Paper is Your Best Friend:** For an added layer of security and ultimate ease, line your pan with parchment paper. Cut a piece to fit the bottom of the pan precisely. For even greater control, cut a longer strip that lines the bottom and extends up two opposite sides, creating "handles." These parchment handles will allow you to easily lift the entire slab of cooled brownies out of the pan. You can lightly grease the pan *before* placing the parchment to help it adhere, and a tiny spritz on top of the parchment can also help with release.
Step 2: Bake and Cool Your Brownies
Follow your chosen
frosted brownies recipe instructions for baking. As mentioned, avoid over-baking! Once baked, allow your brownies to cool completely in the pan on a wire rack. This is non-negotiable, especially if you plan to use a buttercream frosting. Attempting to frost warm brownies will lead to melted, weeping frosting – a mess you want to avoid. If using parchment handles, once cooled, gently lift the entire slab out of the pan and place it on a cutting board or clean surface.
Choosing and Applying Your Dream Frosting
With your perfectly baked and prepped brownie slab, it's time to consider the frosting itself. The type of frosting you choose can dramatically impact the final taste and texture of your
frosted brownies recipe.
Step 3: Decide on Your Ideal Frosting Texture
There are two primary camps of brownie frosting, each with its own charm:
* **Fluffy Buttercream Frosting:** Think classic cake frosting – light, airy, and rich with butter and powdered sugar. This type requires your brownies to be **completely cool** to prevent melting and separation. American buttercream is popular for its simplicity, but you could also explore Swiss or Italian meringue buttercreams for an even lighter, less sweet option.
* **Dense Fudge Frosting:** Often made with melted butter or chocolate, cocoa powder, milk, and powdered sugar, fudge frosting is intensely chocolatey and typically has a denser, glossier consistency. Depending on the specific recipe, some fudge frostings can be applied to **slightly warm brownies** for a delightful, glaze-like effect that sets beautifully, while others are best applied when the brownies are fully cooled for a thicker, more spreadable consistency.
Beyond these two, don't limit yourself! A tangy cream cheese frosting provides a wonderful counterpoint to rich chocolate, or a silky ganache can add a touch of elegance. For more inspiration on frosting types, check out
frosted brownies recipe - Article 2.
Step 4: The Art of Application
Once your brownies are completely cool and you've decided on your frosting, it's time to flip and frost!
1. **Flip Your Brownies:** Carefully invert the entire slab of brownies onto your prepared cutting surface or a large serving platter. If you used parchment handles, simply lift them out and place them upside down. Peel off the parchment paper. You'll now have a perfectly smooth, unblemished surface ready for frosting.
2. **Spread Evenly:** Using an offset spatula, spoon a generous amount of frosting onto the center of the inverted brownie slab. Gently spread the frosting outwards towards the edges, using smooth, even strokes. Don't press too hard, and try not to overwork the frosting. If you want a thick layer, apply half, chill briefly, then apply the rest.
3. **Chill (Optional but Recommended):** For the cleanest slices and to allow the frosting to set, chill your frosted brownies in the refrigerator for at least 30 minutes, or even an hour. This makes cutting much easier.
4. **Cut and Serve:** Once chilled, use a sharp knife (wiped clean between each cut, especially if the frosting is sticky) to slice your brownies into individual squares.
Storage and Serving Suggestions
To keep your delightful frosted brownies fresh, store them in an airtight container. If your frosting contains dairy (like cream cheese frosting) or if your kitchen is particularly warm, refrigerating them is best. Otherwise, they can typically be stored at room temperature for 2-3 days. For optimal flavor and texture, allow refrigerated brownies to come to room temperature for about 15-20 minutes before serving.
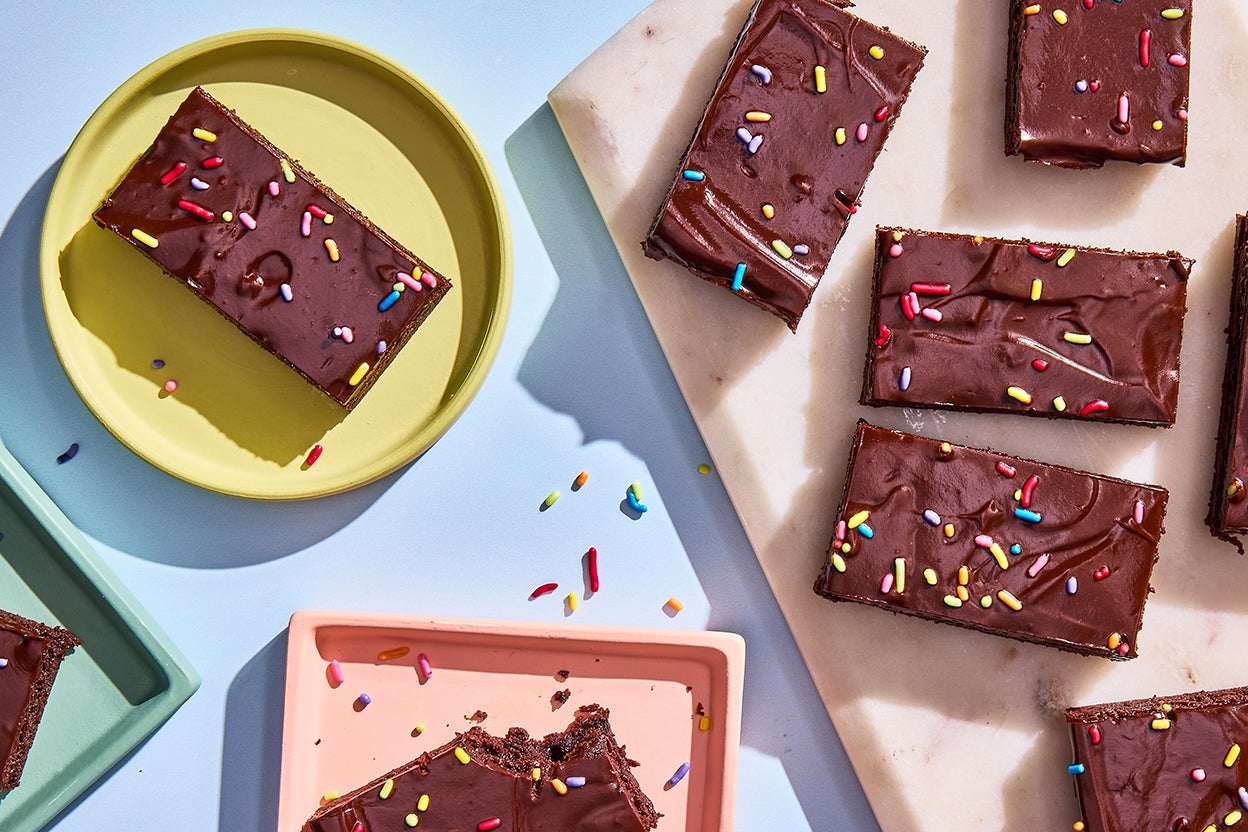
Elevate your serving by adding a sprinkle of sea salt flakes, a dusting of cocoa powder, or some fun sprinkles. A scoop of vanilla bean ice cream or a drizzle of chocolate sauce turns a simple frosted brownie into a show-stopping dessert.
In conclusion, a perfect
frosted brownies recipe isn't just about the ingredients; it's about the technique. By taking that extra step to prepare your pan properly and flipping your brownies before frosting, you unlock a world of smooth, crumb-free perfection. This simple trick transforms your baking experience, ensuring that every bite of your irresistibly rich and fudgy chocolate delight is as visually appealing as it is delicious. So, go forth and bake with confidence, knowing that your frosted brownies will always be a masterpiece!